(ARA) - Here’s another silver lining to the dark economic clouds still on the horizon this holiday season: handmade holiday decorations are not only less costly, they’re perceived as more meaningful as well.
From spending more time with loved ones to an improvement in our overall health, stories abound on the positive side effects of the shaky economy. Increased enthusiasm for handmade items may well be the latest good by-product of troubled economic times.
“Social science experts tell us that tough economic times realign people’s priorities, and we’re certainly seeing that all around us,” says Riddi Kline, vice president, marketing of Jo-Ann Fabric and Craft Stores, a leading craft supplies retailer. “People are placing greater emphasis not just on cost-savings but on the meaningfulness of a decoration or gift. Nothing is more personal and customizable than something you make yourself. And this year, you can find craft ideas to fit every holiday decorating theme.”
So how do you decide what handmade decorations will enhance your home’s holiday décor? Margaret Skinner, director of customer education of Jo-Ann Fabric and Craft Stores offers a few pointers:
* Choose craft items that complement your home’s overall theme. For example, if you love clean, contemporary modern lines, make items that mimic that look. Crafts that incorporate reflective surfaces and metallic looks will fit well with contemporary themes. Softer fabrics and materials will mesh with a country theme.
* Make crafts that will endure and be durable for seasons to come. “You’ll invest your time and a bit of yourself in every item you make,” Skinner says. “Opt for items that will be easy to care for and that will appeal to your sense of the holidays not just this year, but next year and the year after that as well.”
* Give yourself plenty of time and space in which to create. You’re not rushing the season if you start working on your holiday crafts in early November or even late October. You’re just giving yourself plenty of time to accomplish everything you want to do. Also, dedicate a specific area of your home to your crafting and keep all your projects in one place – this way you’ll have everything you need at your fingertips.
* Get kids involved. When you create crafts with your children, you’re not just making decorations, you’re making memories that will stay with them throughout their lives. Plus, making crafts together will make each item feel that much more meaningful when you use it to decorate your home.
* Shop smart when shopping for craft supplies. Jo-Ann Fabrics is a leading seller of supplies for virtually every type of crafting activity. You can find craft ideas and directions to fit every type of holiday décor at http://www.joann.com/createchristmas.
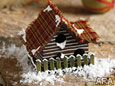
Try this creative craft – a handcrafted birdhouse – that can be customized to fit with either a city or country theme:
A Country Birdhouse
Designed by Connie Glennon-Hall
Supplies and tools:
1 wood birdhouse
1 can Rust-Oleum multicolored texture spray paint, autumn brown
1 each acrylic paints in dark brown, green and ivory
wooden picket fence
Deco Art Snow Writer
1 piece, 12 inches by 12 inches, brown cardstock
1 piece, 10 inches by 4 inches, Homespun fabric
Xyron 510 machine with adhesive cartridge
Tacky glue and glue stick
1/2-inch flat paintbrush
1/2-inch detail paintbrush
wire cutters
scissors
paper trimmer
ruler
sandpaper
Assembly instructions:
1. Sand the birdhouse hole openings to remove rough edges.
2. Paint the entire birdhouse with dark brown acrylic paint. When dry, spray with autumn brown multicolored textured paint. When dry, paint ivory lines with the detail brush.
3. Cut a rectangle of cardstock slightly smaller than the bottom of birdhouse. Glue cardstock to bottom of birdhouse using glue stick.
4. With wire cutters, cut a nine- to 10-picket length from the fence. Dilute green paint and apply a wash coating over fence. When dry, glue to the front of house, along the front base.
5. Measure the three sections of the roof and cut brown cardstock to fit. Run the cardstock through the Xyron machine. Press the sticky side of the cardstock onto the homespun fabric, aligning plaids and allowing 1/4 inch margin around each piece.
6. Trim around roof panels – keeping the 1/4 inch margin of fabric – and fray the edges by pulling out threads. Glue the three panels to the birdhouse roof, allowing fringe to remain exposed.
7. Decorate the house base, fence, perch, openings and fabric roof with Snow Writer.
Uptown (City) Birdhouse
Supplies and tools:
Wood birdhouse
Rust-Oleum textured paint, desert bisque
Deco Art Dazzling Metallics acrylic paint, Champagne gold
1 piece, 12 by 12 inches, tan or gold cardstock
1 piece, 4 inches by 9 inches, Glitter Organza 5/8-inch ribbon
Deco Art Snow Writer
Xyron 510 machine with adhesive cartridge
tacky glue and glue stick
double-sided tape
scissors
paper trimmer
ruler
sandpaper
paintbrush
beaded trim
Assembly instructions:
1. Sand the birdhouse hole openings to remove rough edges.
2. Spray birdhouse with desert bisque textured paint to obscure wood grain. When dry, paint entire house with champagne gold acrylic paint.
3. Cut a rectangle of cardstock slightly smaller than the bottom of birdhouse. Glue cardstock to the underside of birdhouse using glue stick.
4. Attach beaded trim to the side edges of the upper roof using tacky glue.
5. Measure and cut a piece of ribbon slightly longer than the length of lower roof. Put a strip of double-sided tape on one side of ribbon. Squeeze a thin line of tacky glue over the lower roof and then apply the ribbon strip over that. When dry, trim ribbon ends.
6. Measure the two sections of the large roof and cut two pieces of cardstock to fit.
7. Run the cardstock through the Xyron machine. Position the cardstock on work surface with adhesive side up. Cover adhesive side with five overlapping strips of ribbon. Repeat for both roof pieces. Trim ribbon edges.
8. Place the two roof sections, peak to peak and ribbon side down, over the wrong side of the sheer fabric; cut the sheer fabric 3/4-inch larger all around the roof shape. Create a “hinge” between the two roof pieces (wrong side) with a strip of tape. Apply two more pieces of tape along the bottom edges of the wrong sides of the roof sections. Fold the sheer fabric over both long edges of the hinged roof, sticking the fabric to the three strips of tape. Add bits of tape to the bottom roof corners and fold raw fabric edges in, as though wrapping a gift. Secure the roof to the birdhouse with tacky glue. Glue only one roof plane at a time; tip the birdhouse over and weight it down, until glue is dry. Then, repeat for the other roof plane.
9. Decorate the house with Snow Writer, covering up the raw fabric edges between fabric and wood roof.
Courtesy of ARAcontent
No comments:
Post a Comment